Sunday, December 1, 2013

Tis the Season

Hello my loves,
So I'm not going to lie, I'm not entirely ready to enter this crazy holiday season. Thanksgiving completely snuck up on me and quite frankly overwhelmed me. Now, Christmas is my favorite holiday, hands down. I love everything about it: the music, the decorations, and the over-all feeling of kindness and giving. I love getting to teach new generations not only about Santa Claus and Christmas lights but about the birth of Jesus and all the possibilities He brought.
With all that said, though, this year I'm just not in a place that's ready to celebrate. Hard to admit, but I'm still struggling with grief over the sudden passing of my grandmother. We had so many plans that always included her and it's really difficult to find the joy amongst the sadness as I continue these plans, minus one.
I've been toying around with the idea of doing a "random acts of kindness" plan for Christmas after seeing the Pinterest world blow up with tons of fun ideas about it, and this year I thought it would be a great way to change some of my grief into joy not just for others, but for myself.
So I set out on a search through Pintrest-dom to find the best idea that would work for my life, but also force me out of my comfort zone a little bit. I found the blog of a mom who was seeking to put a little bit of Jesus back in to Christmas for her family and came up with a beautiful movement idea not only for her own family, but for families everywhere. Light Em Up You can read all about her back story here. Her plan basically involved not judging each other on what moments and memories we capture as families during the holidays, but finding the true meaning of Christmas together and spreading that. We sadly live in a world that is all about the material, I mean our black Friday starts Thursday afternoon now-a-days, and it can't be a bad idea to start spreading a new idea.
I'm seeking to choose 12 items from the Light Em Up 2012 list of 100 suggested activities to perform in the 24 days leading up to Christmas. Here's the list
Light Em Up 100 Ideas FINAL
I'm so beyond excited for this and I want to keep you all updated every week (so this is also a new challenge for me haha). I also really want you guys to consider joining me in this! Choose anything from the list and help me spread a little joy and hope of the true meaning of this beautiful holiday season.
No really, I'm serious, I want to encourage you guys to try this too! I know the season is busy and stressful, but really isn't that the problem? Christmas isn't supposed to be filled with guilt over parties we didn't attend or shame about traditions we don't perform. It's about the birth of hope that would grow into the only thing that would save the world not just from "the devil" but from ourselves.
I have a feeling that if we let go of some of these obligations that are weighing us down and opening ourselves up to give to others, we will not only experience a holiday season like we could only imagine, but also bleed into vast opportunities for God to continue to change us and those around us.
If you really don't feel like you're capable of participating in this, I would love for you guys to encourage and pray for me instead. I know that this will be a great challenge for me to drop some obligations and carve some time out and I don't want to fall off the wagon half way through haha, so if you think about it, send me some love and supportive thoughts ;)

I really appreciate all of you who read my crazy ramblings, and I can't wait to celebrate this season with you!

<3 ME

Saturday, November 30, 2013

Potter-Ween

Okay, so a month later I'm finally getting around to telling you all about Potter-ween! It's been a crazy month, which I feel like is my excuse every time it takes me forever to put up a new post and I apologize but this one was worth the wait!

This year I decided to try to start a new Halloween tradition by celebrating my favorite wizard book series, Harry Potter. I coined it Potter-ween and set out to put together most of my favorite Harry Potter moments and objects in this themed party.

It took SO much time combing through pins and blogs and so many links to find printables, labels, fonts, tutorials and ideas so hopefully if you love Harry Potter and would like to throw your own Potter-ween then this will be helpful for you! I'm trying my best to compile everything in this one post, or you are also welcome to visit my Harry Potter Pinterest board for more ideas and links. here

First things first were the decorations. I decided on 5 main areas: Potions class, Honeydukes, Ollivanders, The Three Broomsticks and The Great Hall.

Potions Class:
 
 
So I coupled the classroom with a little bit of Chamber of Secrets. I created TONS of potions (here are a few up close pics) I basically just took names that I knew from the books and made stuff that I thought they might look like.

I used pumpkin guts for Boomslang Skin, and pumpkin guts with green food coloring for Gillyweed. I used some coffee beans for Bezoars.
For the liquid potions I just used water with different food colorings: Felix Felicis (yellow), Herbicide (green), Veritaserum (clear). For the containers I used a lot of Mason Jars that I already had around the house for decoration (I know all of you are really surprised that I decorate with Mason Jars) and some old candle jars, glass mixing dishes and some small glass vases that I picked up at the dollar store. Hobby Lobby also has great sales on glassware every now and again if you want some with lids or with more interesting shapes (also, don't forget they always have a coupon online that you can use on one full-priced item!)
I used just basic folder labels for the jars and used a cool Harry Potter font that I found here. I used Parseltongue for these jars.

 
To give it further ambiance as a potions classroom I got a huge black pumpkin/cauldron from Target that I filled with glow sticks (dry ice would also be a good touch, but I honestly just didn't have time for that haha). I also scooped the tops out of several baby pumpkins that they sell in the grocery stores and put tealights in them. They gave a really great glow to the area. I also draped some purple Halloween light strands around the potion containers. All in all I thought it was a pretty effective area :)
 
Honeydukes:

 
This area was unfortunately right next to the Potions class so it wasn't as bright as I would have liked it to be, but for the layout of things it just worked best for me to put it here. I used a pink plastic table cloth I picked up at the dollar store, some candle sticks I already owned and just glass pinch bowls. I didn't really feel like making any of my own candy so I just used store bought: Blow Pops (acid pops), Twizzlers (licorice wands), Jelly Beans (Bertie Botts Every Flavored Beans) and Chocolate covered peanuts (cockroach clusters). Jelly Belly does make non-traditionally flavored jelly beans in two collections: Bertie Botts Every Flavor Beans or Bean Boozled, but I honestly wasn't sure if anyone would eat them if they knew there were gross flavors ;).
For the labels I found these super cute ones. I just used the blank one and wrote in my own, but you can absolutely use a fun Harry Potter font if you want. 


The Three Broomsticks:
 
I used this location as my drink station. I made Pumpkin Juice and Butterbeer for the night, of course. Honestly I thought they both turned out really well! There was a topping for the Butterbeer but I chose not to do it just for time management and I wasn't super sure what would happen to it if it sat out for a few hours at the party.
 
Pumpkin Juice Recipe:
1 bottle apple juice
1 large can pineapple juice
1/2 cup pureed pumpkin
2 teaspoons pumpkin pie spice
Blend together in a blender and serve chilled
 
Butterbeer Recipe:
1 liter cream soda
2 Tablespoons Butterscotch syrup
Blend together in a blender and serve chilled
(you can also add ice before you blend and make it more of a slush)
 
The Great Hall:
I used some tulle I had laying around and tied some emergency candles that I found at the dollar store to simulate the floating candles that are famous in the Great Hall. It would also be really cool to use LED candles but they were a little pricey for me :(
I used this as a place to serve some appetizers. I made Cornish Pasties and they were really easy and really yummy! Here's the recipe I used. (The measurements are in metric, but I just searched for conversions).
I used place cards to label everything and I used another great Harry Potter font from Mugglenet (link is above in the Potions Class section).
 
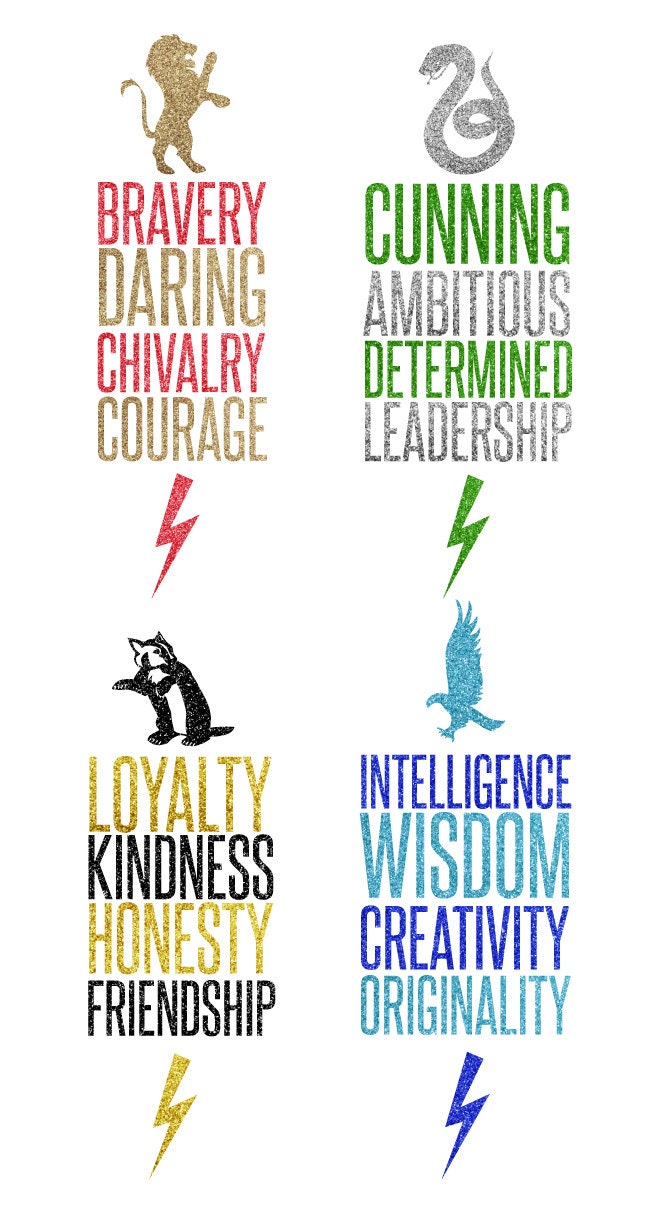
I also used this as a place to have all the guests sorted. I had a sorting hat of course
 
It was just a witch's hat I picked up on clearance at Target and spray painted with some black/bronze/silver and stuffed some plastic bags in the point so I could fold it and make it look like it had a face. I also made name badge stickers with each house's emblem on it so that after you were sorted you could proudly display your house! Here's the link to the pictures I used. I also posted this picture so that my guests who weren't as familiar with the intricacies of Harry Potter as I am could understand a little bit about their new house.
To perform the sorting, I made mini cupcakes that I then filled with different colored icing (red, green, blue and yellow). I thought it was a fun way to incorporate a dessert and self-pacing so that sorting everyone didn't have to be a huge ordeal.

I also hung some portraits, Educational Decrees and the Marauder's Map on the wall for some added character. I'll post links to all the things I hung up down below.
 
 
Ollivanders:

 
The famous wand shop! I thought this would be a super fun way to incorporate a craft for the kiddos, and adults ;). I combined several wand tutorials I found online into something that I thought was super fun and pretty successful.
I used these giant cinnamon sticks I found at Hobby Lobby. I was really hoping for some bamboo sticks but it just wasn't in my luck to find any when I went shopping.
The key was to find something that was hollow with a big enough hole to stick the magical core in to.
I plugged one end of the sticks with nail hole filler.

After that dried, I then had some fun putting crazy designs all over the sticks with hot glue. I basically just put a bunch of squiggles, lines, dots everything to make it textured and "magical" looking.
 
Then I painted them with some metallic acrylic paint.
 
I had to do a couple of coats especially with the gold wands because the paint had a difficult time sticking to the hot glue in some areas.
 
Once dry they were ready for a tag and time to wait for the witch or wizard to choose them!
I used some gift tags that I found at Hobby Lobby, of course. I wrote Ollivanders on one side and then wrote a wood, length, and descriptive word on the other side. (example: 11 1/2 inches, Holly, surprisingly swishy) I just made up the descriptors and lengths and I got all of the wood names from Pottermore.
 
Now for the craft part: I had three different wand cores to choose from
 
Dragon Heartstring: I pulled some strands out of a pom pom that I had
 
Unicorn Hair: I found these awesome pipe cleaners and just cut them in half to ensure they would fit inside the wands
 
Phoenix Feather: just a bag of craft feathers from the store in fun phoenix-y colors
 
After choosing a wand and a wand core, everyone just put the core inside the open end of the sticks then I filled the other end with more nail hole filler and put a dab of matching paint on the end and they were off to perform magic!
 
I also included some spells for the new witches and wizards to try:
Information was found in the Harry Potter books by J.K. Rowling
 
I also included some information about the different wand cores and wand woods found at Pottermore (link above).
 
 
I even incorporated some Harry Potter in the jack-o-lanterns on the porch, which of course Dooleydog helped me carve!


I also had PLENTY of pictures hung randomly around the house. Here's a link to all of them.
 
All in all it was super fun to decorate the house with my favorite book and unfortunately to fully expose the extent of my nerdiness, and it most definitely is going to become an annual event!
 
 
Can't wait to hear all about your own Potter-ween!
 
<3 ME


Wednesday, November 6, 2013

Win Some Lose Some

It's been a tough few weeks for my Georgia Bulldogs, and not such a happy environment around the Dailey household. But even with the doom and gloom associated with learning how to love despite losing, my favorite season is taking residence here in the south! It's been down right chilly and I've even gotten to wear a coat to work in the mornings.

And with this I bring you the last pumpkin recipe of the season.

Pumpkin Snickerdoodles

Here's where I found the recipe originally.

As always, first things first we assemble the ingredients.
 
 
Mix the dry ingredients together in a medium bowl first (flour, baking powder, salt, cinnamon, and nutmeg).


Then combine the sugar and butter together until light and fluffy. We've talked about the importance of this process previously when we made the pumpkin pound cake, but basically this puts a lot of air in the dough which will help the cookies rise, which is an essential part of a snickerdoodle!
 
 After you've creamed the butter and sugars together, add in the pumpkin.
 
Then slowly add the dry ingredients into the butter/sugar/pumpkin mixture until it comes together in a dough. If you've never made snickerdoodles before, the dough will be extremely sticky and that's completely normal. To help the cookie making process easier, chill the dough for at least an hour until it's nice and firm.

 
After your dough has chilled, it's time to add the sugar mixture to the top. Mix together the sugar, cinnamon, ginger and allspice on a plate.


Now you're going to dip a glass in some water to wet the bottom and then dip in the sugar mixture. I set up an assembly line to make it a bit easier and contain any mess!


With the sugar-coated glass you'll press down each cookie until coated with sugar and flattened slightly.


Bake at 350 for 10-12 minutes. Let them cool for 5 minutes on the pan and then transfer to a wire rack to finish cooling completely. Then enjoy the taste of fall!


You can find a printable version of this recipe here.

THE REVIEW:
So, if you don't know, snickerdoodles happen to be my favorite cookie. I am somewhat of the snickerdoodle expert in my family and I make them every year for Christmas. That being said, I'm probably a little more harsh on this recipe than the average pumpkin recipe because of my absolute love of these cookies. The pumpkin version did taste good, however, the texture was off a bit for me. The pumpkin, as it does in most recipes, made the cookie kind of spongy. Instead of a crisp coating and an airy and chewy center, these were more cakey in consistency. So, although they tasted good the texture will probably turn me off enough to not make them again without some serious tweaking of the recipe. I would definitely try draining the pumpkin and hopefully the decrease in moisture will also decrease the cake-y-ness of the overall cookie.

Here's my recipe review card.

So unfortunately we close out the pumpkin recipe reviews with a bit of a let down for me, but hopefully it'll be a good recipe for you guys to try out and I'll keep hope that good things are on the horizon for us!

Stay tuned for my next post where I'll show you how we celebrated Potter-ween!!

<3 ME

Tuesday, October 8, 2013

Give Up the Funk

Every once in a while I find myself in an absolute funk. My week is busy, I'm tired, my house is a mess and I'm utterly unmotivated to do anything but lay on my couch, watch trash tv and eat chocolate.
This was my week last week. Not sure what the root cause of all this funk was, but the biggest tragedy was that I had no chocolate in my house. Luckily for me, however, I found this delicious new pumpkin recipe!
Who doesn't love puppy chow (aka about five million different names) that sweet chocolately-peanut buttery chex mix full of enough sugar to send a five year old to Mars? How in the world can you improve upon this recipe?! I tell you, I might have found just the recipe to sway you!

Pumpkin Pie Chex Mix

Now, while this recipe does not contain any actual pumpkin it contains all the yummy flavors of pumpkin pie and it's super easy to make. After making it initially to take to a little get together with the office girls, I've made it twice since!

I found the original recipe here.

As always, first things first: ASSEMBLE THE TROOPS!


For my initial making of this recipe, I used plain rice chex as it calls for in the recipe, however in re-making it I used Cinnamon chex and I have to say it added so much more flavor!

Measure out your powdered sugar into a gallon-sized baggie and set aside. I also mixed some additional pumpkin pie spice into the sugar. I didn't measure it just a few good shakes until the powdered sugar is tinted slightly tan.


Put the white chocolate chips and the Biscoff in a microwave safe bowl and heat on high for 1 minute, stir, then heat an additional 30 seconds.


DON'T SKIP THIS STEP!!! Now add in the teaspoon of pumpkin pie spice to the chocolate/Biscoff mixture and stir to combine.


The recipe calls for you to then pour the cereal into the chocolate/Biscoff mixture, but I prefer to have my cereal in a large bowl and pour the liquid on top of the cereal and gently stir to combine. I find that this allows me to more thoroughly mix the ingredients and lessens my chances of crushing the cereal into tiny pieces.


Now you dump the cereal mixture into your gallon baggie with the powdered sugar. Leave some air inside the bag and seal it up, TIGHTLY! Shake it around gently breaking apart large cereal clumps with your fingers (through the closed bag) to allow it to be fully coated in the powdered sugar.


And voila! Pour into a bowl and stand back because this stuff is dangerously hard not to eat in an entire sitting!


Other variations to try include adding roasted pumpkin seeds or nuts to the cereal to make it more trail mix-y.

Review: This recipe was SOOOO easy. It took less than no time and was so delicious. I don't tend to keep white chocolate chips or chex cereal on hand, so I had to pick those up as well as the Biscoff. It took less than 10 minutes to make the whole batch from start to finish. Now, the calorie count wouldn't be so bad if it was possible to only have a serving at a time, but it's nearly impossible not to stand over the bowl and eat until you are ashamed... That being said, I'm definitely adding this to my fall arsenal and will probably make it several more times this season! Overall I give it a 42/50.

Here's my recipe review card for this recipe.

And you can print it out here!

So, although I did not have my tried and true chocolate to soothe me during my funk I had this new found delicacy and a whole heck of a lot of prayer. I survived the funk and found a new fall favorite, what more could I ask for?

<3 ME

Sunday, September 22, 2013

Hidden Blessings

Hey Ya'll,
So I don't know about you guys, but this last week was absolutely crazy! There were a ton of downs with a couple of ups and plenty of loop de loops (and not the good kind where you're buckled into a roller coaster seat, but the kind where your parachute doesn't open after you jump out of the plane.)

But despite all the craziness, I have actually gotten to experience beautiful sunny days (albeit a tad warmer than I would appreciate at this time of year) and wonderfully chilly nights and mornings. Dare I say that it's starting to feel like fall?!?!?!?!?! (I mean still summer, of course)

How could I ask for a more perfect week to try out the first pumpkin recipe?

PUMPKIN POUND CAKE

I grew up in a family where you made a pound cake for every occasion. Birthdays, new neighbors, sympathy, and Tuesdays. I'm not really sure why exactly it's called a pound cake (I think it's something to do with the fact that the old recipes call for a pound of flour/butter/sugar), but I do know they are dense and buttery and so great when served with ice cream. But now that it's fall, it's acceptable to add pumpkin to everything right?

So Pumpkin Pound Cake, I found the recipe here.

First things first: gather the ingredients!
 
 
Preheat the oven to 350 and grease and flour your tube or bundt pan. I used a bundt pan so that the top was a little prettier and I used Baker's Joy instead of grease. I like the spray because its more convenient and far less messy, but I really like to use this brand that has some flour in it for baking.
 
 
The next thing you want to do is drain the pumpkin. Pumpkin has an extremely high water content and although this makes it add tons of moisture to anything you're making it can also throw off textures and consistencies when baking. I lined a bowl with a double layer of paper towels, put in the pumpkin, and then topped it with some more paper towels. I let it sit while I mixed together the dry and wet ingredients; patting it down occasionally to ensure maximum drainage.


So, while you wait for that to drain: cream the butter and sugars together.
 
**SCIENCE BREAK**
Creaming is a really important process in some baking recipes because the sugar crystals cut into the fat molecules in the butter or lard or whatever the recipe calls for creating air bubbles. These air bubbles in turn assist the product in rising during the baking process as the air is released through the surface of the cake.
 
Okay, back to the cooking... cream the butter and sugars together. It should look "light and fluffy" when you're done.


Add the eggs one at a time. This will smooth out the mixture.


Then add the drained pumpkin and vanilla, and mix until well incorporated. It should get really fluffy during this step! It will also look a little grainy, but never fear, this is normal :)


Now, round up all of your dry ingredients. I like to sift my flour, which isn't called for in the recipe, but I find it cuts down on any over mixing of the batter because it takes out all those icky clumps.


You're going to add this into the pumpkin mixture, alternating with your buttermilk.
 
Now, BUTTERMILK. I don't tend to buy buttermilk, because I only use it when a random recipe calls for it or if I'm making my Ninny's biscuits (which is my grandmother for those of you not lucky enough to have met this amazing woman). It's all over Pinterest that you can simply freeze the leftover buttermilk in ice cube trays and melt as needed, but my mom found this little gem!


This is essentially powdered buttermilk. Add a couple of tablespoons and then dissolve in water (exact measurements depend on how much the recipe calls for). It has a super long shelf life and for some reason I have more pantry space than I have freezer space so this was a great solution for me!
 
 
Okay, back to the recipe: Alternate the dry ingredients and buttermilk until the mixture is thick, fluffy and all incorporated.


Now, pour it into your greased pan and bake for 45-55 minutes or until a toothpick draws out clean.
I forgot to take a picture of it pre-baking (sorry) BUT here's the final product. Transfer this to a wire rack to cool completely and mix up the glaze.


Combine all of the glaze ingredients in a small saucepan over medium heat. Stir constantly as you don't want the mixture to scald, bring it to a boil and cook for one minute until thickened. Drizzle this over your cake and ENJOY!!!


We used it to celebrate Gigi's birthday and it was a huge hit, even with Little Man!
 
 
REVIEW: This recipe was really easy to follow and didn't call for any weird ingredients or equipment. The only ingredients I didn't have readily on hand was the pumpkin and the buttermilk (buttermilk is a turn off for some people because I know we don't use it a lot in our daily lives, but I think the powdered alternative is great to make it more readily available in your pantry and to decrease having to avoid certain recipes because it calls for it). It does require quite a lot of baking time (almost an hour) including the prep and making the glaze afterwards, but it's pretty comparable to normal cake baking. The cake was moist, but not spongy like some pumpkin recipes can be (I think draining the pumpkin really helped with this). It's not a "skinny" recipe, but for a pound cake that used to require a pound each of flour, sugar and butter, it really isn't that unhealthy of a cake.
Overall, I give it a 38/50 and I definitely recommend adding this twist on the original pound cake to your recipe box! Here's my Recipe Scorecard for the Pumpkin Pound Cake


Also, you can print the recipe here.


So, crazy week followed by a great pound cake and celebrations with family. What a great reminder that my God is faithful and with every trial comes endless examples of His love.

I hope y'all are able to find some of His love amidst your craziness this week too!

<3 ME